Description
This pack contains:
– UVBM-Eyes for iClone 7, map eye movements to UV offsets
What this is:
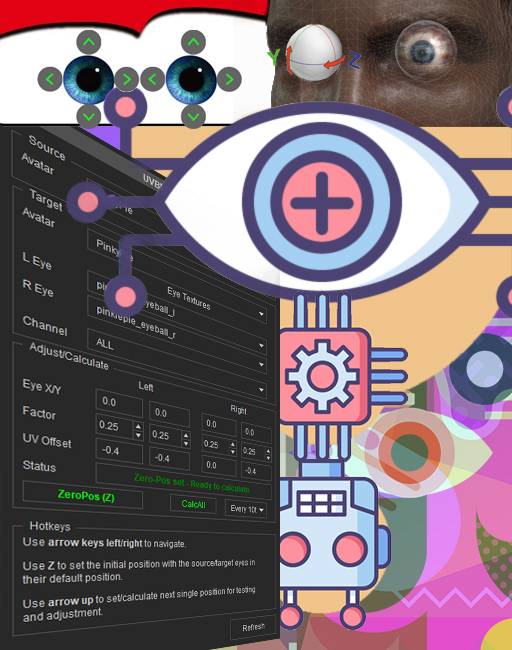
A plugin to map eye movements to UV offsets of irregular shaped eyes that can not be animated otherwise
How to install:
1# After downloading the Zip file.
Open the Zip and copy the plugin folder (3DEA_UVBMEyes) in your “OpenPlugin” in iClone.
E.g.: “C:\Program Files\Reallusion\iClone 7\Bin64\OpenPlugin”
In case the “OpenPlugin” folder is missing, just create a new folder with the name “OpenPlugin”.
2# Start iClone in admin mode as the plugin may need to install 3rd party python modules.
(Only need to start in admin mode the first time after you installed the plugin)
3# Start the plugin via Plugins>3DEA>UVBM Eyes
How to use it:
A) Using a dummy avatar
1) Identify the eye textures in your target avatar. In some cases you will need to amend the texture for making it larger to have more of the eye white for example (so that you can move it far enough without it appearing twice).
Some characters might need some tweaking to get the wanted results.
2) Create the expression clip wanted with some dummy avatar.
3) Select the source avatar and the target avatar with it’s respective texture maps
4) Select the channels required diffuse, opacity, etc. or ALL – Note: you can apply different offsets per channel to achieve some effects.
5) Go to the start position of the clip and click “ZeroPos”. This will set the initial default values (eyes should look straight in their default position – The source eyes and target textures should be aligned.
6) Set the factor for the offset calculation. This is the multiplication factor of the eye rotation difference to translate into the UV offset. Just give it a go with the default (0.25) – depending on your target eyes you might want to set it lower (less movement) or higher (more movement). In case the eyes are not round/square but differently shaped, you can set the U and V (X/Y) values separately.
7) Select the amount of keys to set (every 10th is default). For each change in the eye position there will be one key at the beginning and one at the end. The changes in between can be set for each frame, evrey 2nd, 3rd,5th or 10th.
8) Click “CalcAll” and you should have all the keys set.
B) Using dummy bones
It is the same process as for A except that the source avatar is the same as the target one. If you have any unused bones which do not affect the mesh (E.g. any end bones or if you create two), you can map those to the eyes in 3DXchange.
You can then use the avatar to create the expression clips (but won’t see any movement yet) and then follow the procedure as under A to generate the UV offsets.
> You can change the factor values and just go back to the start and hit “CalcAll” again when optimizing the values.